
Want nails that sparkle like the night sky? Star nail art is one of the easiest ways to create a magical, trendy look right at home. Whether you love soft, minimal designs or bold glittery styles, stars can instantly upgrade your manicure.

The best part? You don’t need to be a professional. With a few simple tools and a little patience, you can create stunning star designs that look salon-worthy.
Let’s get started.
Why Star Nail Art Is So Popular
Star designs are timeless. They work for every season and mood.
Here’s why people love them:
- Simple yet eye-catching
- Perfect for beginners
- Easy to customize with colors and glitter
- Great for both short and long nails
You can go subtle with tiny stars or bold with bright, glittery patterns. The choice is yours.
Tools You’ll Need
Before you begin, gather your basic nail art tools.
- Base coat
- Nail polish (dark and light shades)
- Nail art brush or toothpick
- Dotting tool (optional)
- Star stickers or decals (optional)
- Glitter polish (optional)
- Top coat

Tip: If you’re a beginner, star stickers can make your job much easier.
Step-by-Step: Creating Simple Star Designs
1. Prep Your Nails
Start with clean nails.
- Remove old polish
- Trim and shape your nails
- Apply a base coat
This helps your nail art last longer and look smoother.
2. Apply Your Base Color
Choose a background color that makes stars pop.
Popular options:
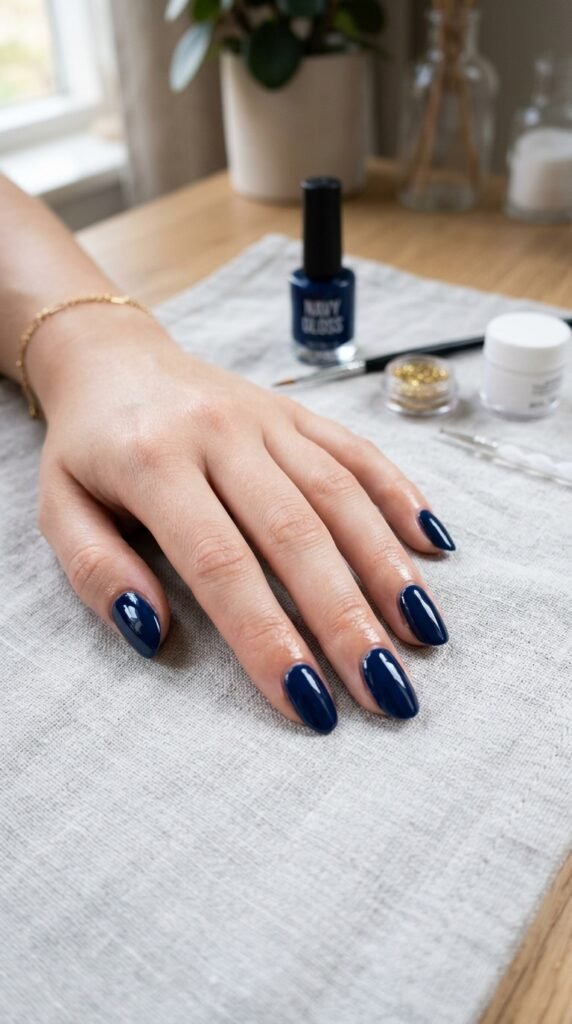
- Black or navy for a night sky effect
- Nude or pastel for a soft look
- Glitter base for extra sparkle
Apply 1–2 coats and let it dry completely.
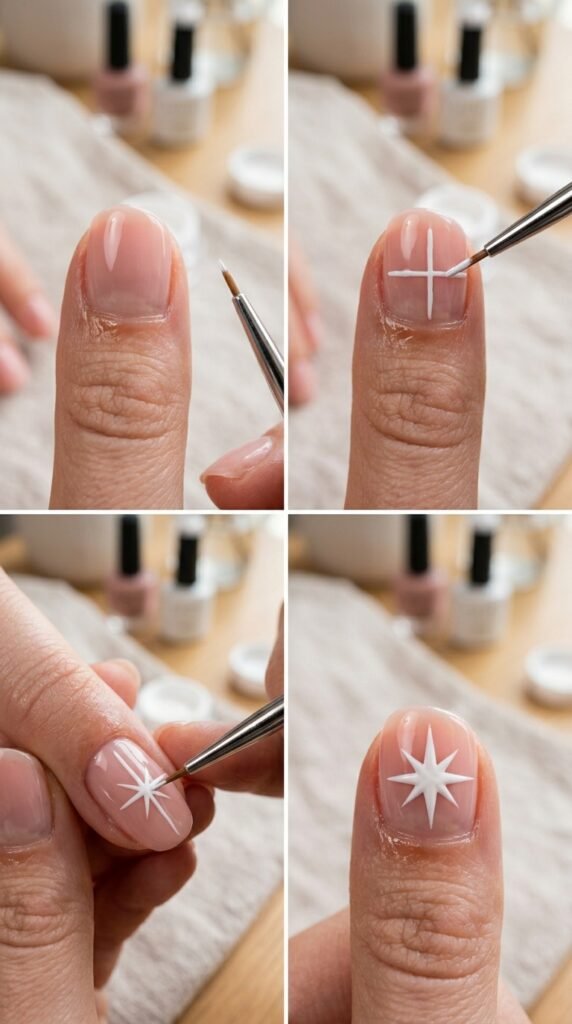
3. Create Star Shapes
Now comes the fun part.
Method 1: Using a Brush or Toothpick
- Draw a small “X” shape
- Add a “+” over it
- Keep lines thin and delicate
This creates a simple star effect.
Method 2: Using a Dotting Tool
- Make a small dot
- Drag outward lightly in 4–5 directions
This gives a soft, glowing star look.
Method 3: Using Stickers
- Place star stickers on dry polish
- Press gently to secure
Perfect for quick and clean designs.
Add Extra Details for a Magical Look
Once your stars are done, you can enhance the design.
Try these ideas:
- Add tiny dots around stars for a galaxy effect
- Use glitter polish on top of stars
- Mix different star sizes for depth
- Combine stars with moons or sparkles
Don’t overdo it. A few well-placed stars look more elegant.
Color Combinations That Work Best
Choosing the right colors can make your design stand out.
Top combinations:
- Gold stars on black nails
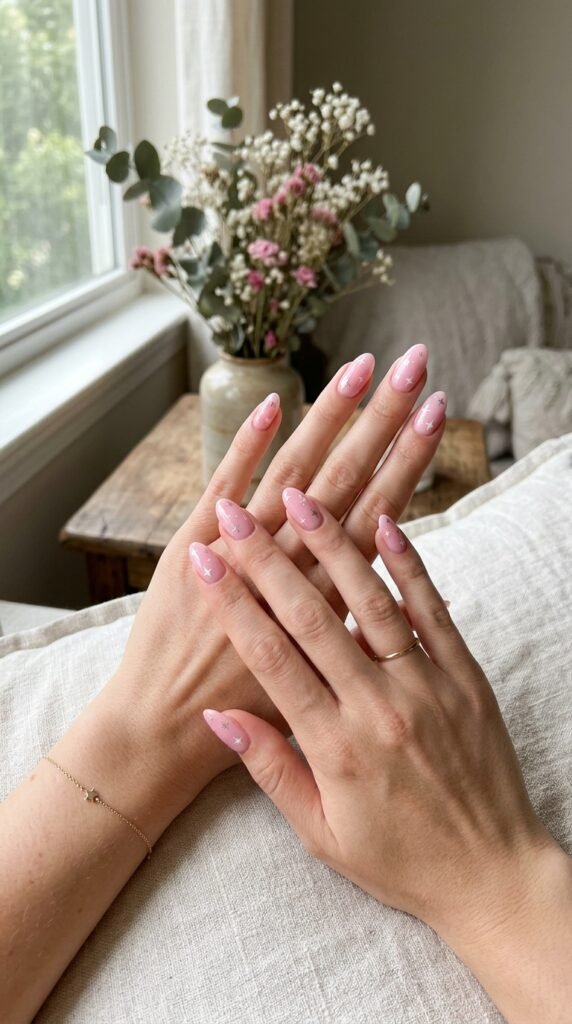
- White stars on pastel pink
- Silver stars on deep blue
- Holographic stars on nude base
These combos are trendy and easy to create.
Tips for Perfect Star Nail Art
Keep these tips in mind for the best results:
- Work on fully dry polish to avoid smudging
- Use a thin brush for neat lines
- Keep your hand steady while drawing
- Start with simple designs before trying complex ones
- Always seal with a top coat
A glossy top coat makes your stars shine and protects your design.
Common Mistakes to Avoid
Even simple nail art can go wrong. Here’s what to watch out for:
- Making stars too big or uneven
- Using too much polish on the brush
- Not letting layers dry properly
- Skipping the top coat
Take your time. Nail art is all about patience.
Easy Star Nail Art Ideas for Beginners
If you’re not sure where to start, try these simple ideas:
- Accent Nail: Add stars to just one nail
- Minimal Look: One tiny star on each nail
- Galaxy Style: Mix stars with dots and glitter
- French Tip Twist: Add stars near the tips
These styles are beginner-friendly and look beautiful.
Final Thoughts
Star nail art is fun, creative, and surprisingly easy to do at home. You don’t need expensive tools or expert skills—just a little practice and imagination.
Start simple, experiment with colors, and let your creativity shine.
Save this guide and try your own star nail design today. Your nails deserve to sparkle.

Leave a Reply