
There’s something undeniably mesmerizing about ombre nails. That soft, seamless fade from one color to another instantly elevates your manicure. Whether you love dreamy pastels, bold brights, or chic neutrals, ombre nail art gives you that salon-quality look without needing professional skills.
If you’ve ever scrolled Pinterest and thought, “I wish I could do that at home,” you absolutely can. This guide walks you through exactly how to do ombre nail art step by step, in a way that’s beginner-friendly and easy to follow.

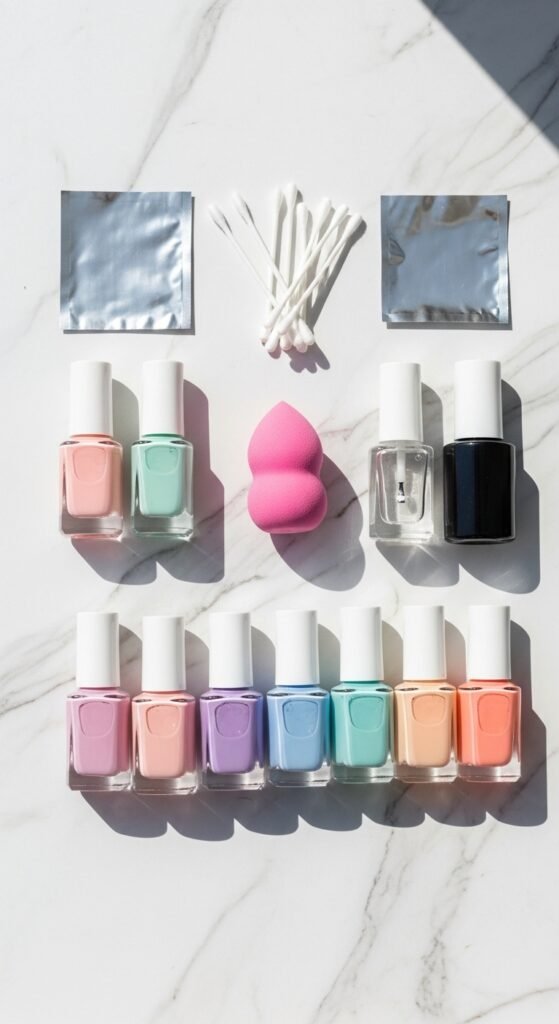
What You’ll Need
Before you start, gather your tools. Having everything ready makes the process smoother and less messy.
Essentials:
- 2–3 nail polish colors that blend well together
- Base coat
- Top coat
- Makeup sponge (soft wedge style works best)
- Small piece of foil or wax paper
- Nail polish remover
- Cotton swabs or a small cleanup brush
- Liquid latex (optional)
Color pairing ideas:
- Nude + white
- Peach + coral
- Blue + lavender
- Pink + purple
Step 1: Prep Your Nails
Great nail art always starts with proper prep.
- Remove any old polish completely.
- Trim and shape your nails.
- Gently push back your cuticles.
- Lightly buff the nail surface.
- Wash your hands to remove dust and oils.
Apply a thin layer of base coat and allow it to dry fully. This protects your natural nails and helps the polish adhere better.
If you have ridges, consider using a ridge-filling base coat for a smoother gradient.
Step 2: Apply the Base Color
Choose the lightest shade from your selected colors and apply one to two thin coats. Let each coat dry completely before adding the next.
This base layer helps the ombre effect appear more vibrant and seamless.
For example:
- If doing pink to white, use white as the base.
- If blending purple and blue, start with the lighter shade.
Allow the base to dry thoroughly. If it’s still tacky, the sponge may lift the polish during blending.
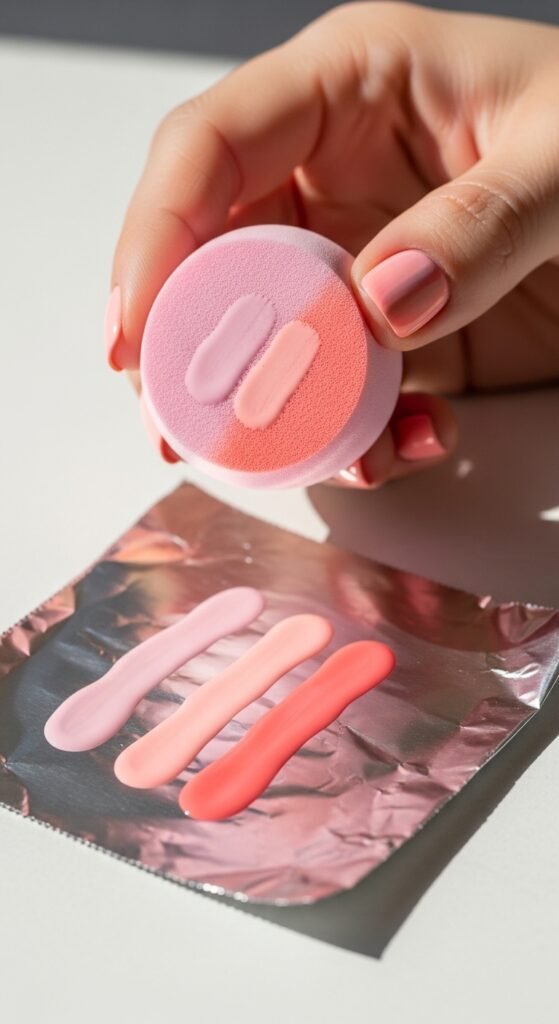
Step 3: Prepare the Ombre Sponge
This is where the gradient magic begins.
- Place a small piece of foil or wax paper on your workspace.
- Paint horizontal stripes of your chosen colors next to each other so they slightly overlap.
- Gently dab your makeup sponge into the polish so both colors transfer onto it.
The slight overlap helps create a smooth transition between shades.
Step 4: Dab the Color Onto Your Nails
Lightly press the sponge onto your nail using a gentle up-and-down dabbing motion.
Do not swipe. Dabbing helps blend the colors naturally.
You may need to:
- Reapply polish to the sponge between nails
- Repeat the dabbing process two to three times for full opacity
It may look messy around your fingers, which is completely normal.
If you want easier cleanup, apply liquid latex around your nails before sponging. It can be peeled off afterward.
Allow each layer to dry slightly before adding more polish to prevent smudging.
Step 5: Clean the Edges
Dip a small brush or cotton swab into nail polish remover and carefully clean around your cuticles.
This step makes a noticeable difference in the final result. Neat edges instantly elevate the look and make your manicure appear professionally done.
Take your time during this step for the best finish.
Step 6: Apply Top Coat
Finish with a generous layer of top coat.
This step:
- Blends the gradient even more
- Smooths out the sponge texture
- Adds shine and durability
Use a light, floating motion with the brush so you don’t drag the design.
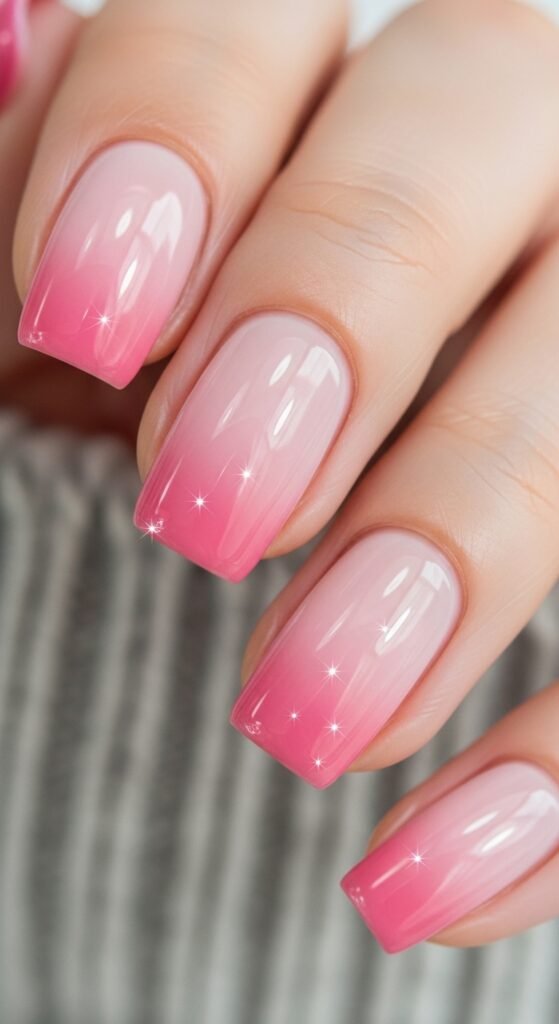
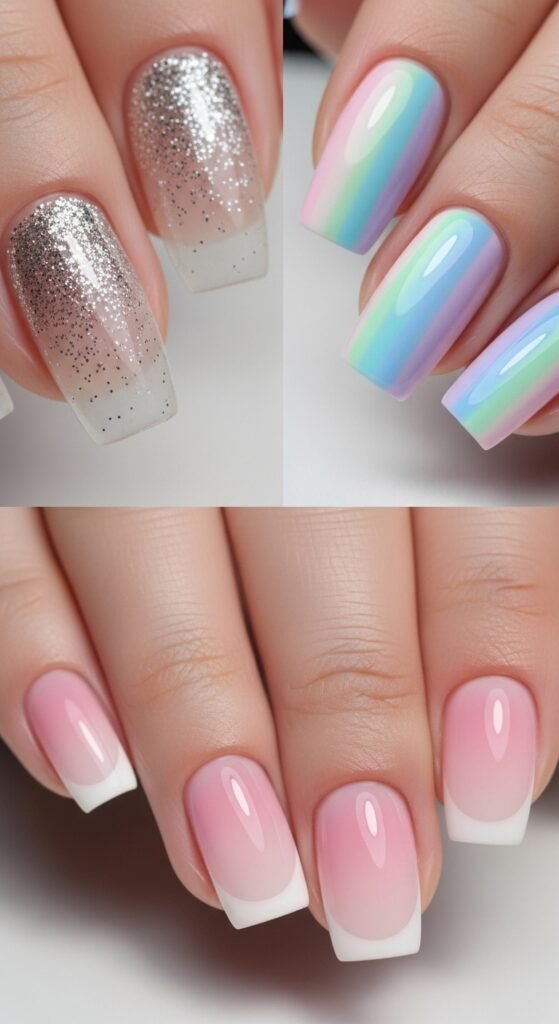
Ombre Nail Variations to Try
Once you master the basic technique, there are endless ways to customize your look.
Glitter Ombre
Apply fine glitter polish to the tips for a sparkling fade.
Vertical Ombre
Blend colors from side to side instead of top to bottom.
French Ombre
Create a soft white-to-pink fade for a clean, elegant look.
Bold Contrast Ombre
Try dramatic combinations like teal and black or neon shades for a statement manicure.
Common Mistakes to Avoid
Keep these tips in mind:
- Using too much polish on the sponge
- Not allowing layers to dry between applications
- Skipping the top coat
- Swiping instead of dabbing
Thin layers and patience create the smoothest gradients.
Final Thoughts
Ombre nail art may look complex, but once you try it, you’ll see how simple and satisfying it can be. With just a sponge, a few complementary shades, and a little patience, you can achieve a beautiful gradient manicure at home.
Pick your favorite color combination and give it a try. Save this guide for later and come back whenever you want a Pinterest-perfect manicure.

Leave a Reply